electronic mixer
At my beginnings in model making, I did not have a programmable radio, my gliders were encumbered of mechanical mixer ailerons/profondor with all the associated constraints. I would have so much appreciated an electronic version of the thing that I decided to design one, only for fun, for the not very fortunate beginners...
I thus propose you a small assembly which will not ruin you. You'll need :
- two servo wires,
- two ends of pins connectors with 2,54 mm pins spacing (for the male plugs)
- only one electronic component (PIC 12C508) US $2 microcontroler...
- a small piece of printed circuit board with holes
the realization
You can make a printed circuit if you wish, or use a board with holes. Another option, that I do not advise you, consists in welding everything directly onto the pins of the integrated circuit, and then protect it with a good layer of epoxy!
Take care nevertheless, if you use this method, not to dissolve the connector with pins while heating. I advise you to hold the three pins with flat-nose pliers which will maintain everything in place...
By the way, go ahead with softness if you do not want to
destroy the integrated circuit (do not use an iron of more than 30
W)!
Do not rectify the pins of the PIC not to weaken them...
One realization made by Gilles ;-)

Franck proposes another option to reduce the size, plugging the PIC on on a Dual In Line support (DIL). CA glue the 3 pins connectors directly on the DIL. Gently bend the DIL's pins so that they can be in contact together and weld them.


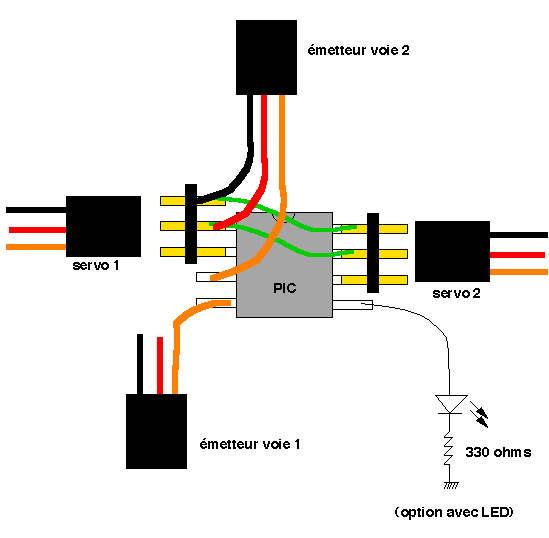
Some remarks on the diagram :
- the reference mark of the integrated circuit is on the top, the circuit is seen from top...
- I've represented standardized connectors (Graupner, hitec or Futaba) for the others consult this extremely well made page.
- the two + and - wires of transmitter channel 1 " emetteur voie 1 " are not connected. The feeding is done by the other channel.
- do not forget to connect both - and both + together (green wires on the diagram)
- For those who wish , one can connect a LED with a resistor in serial towards the mass (black wire). It will light during 10 seconds after reset during the neutral point adjustment phase (see further).
All that is nice, but where can you find the PIC microcontroler ? Two options are offered to you:
- program yours starting from .HEX file provided here, or even compile the C source file also provided (I don't move back in front of any sacrifice, but I ask you not to market it). The source is abundantly commented on (in french but it is easy to understand !), have a look in it, if you want to see how it works.
- contact me to obtain one ready programmed ...

For more informations on the PIC's family, best is to go directly to manufacturer's web page : MICROCHIP.
how does it work?
You guy knows that at receiver output one finds a 50 Hz pulse width modulated signal (if not, it is because you did not go and see the servo reverser page !).
For each servo, there is thus a variable width pulse of approximately 1,5 ms at the neutral point + / - 0,5 ms according to the position of the handle.
This means that after a pitch control, the command given is
thus N+P ms
(N = 1,5 ms of neutral, P varies between [ - 0,5; +0,5
]
In the same way, for the ailerons command, the pulse lasts N+A
ms.
To mix ailerons and profondor together, it is needed to generate two widths modulated pulses
N + (A+P)/2 ms
N + (A-P)/2 ms
It is what does to the microcontroler using an internal timer.
These small things, although powerful, remain relatively rustic. The coding dynamic of the timer and uncertainties on the internal clock of the microcomputer, lead to a coding of the useful value (A and P) on only 7 bits whtich means 128 possible positions of servo (or a resolution at the output a little better than one degree). Don't worry, in my opinion, that is quite enough and that iq not to far from what one obtains with a simple programmable radio...
in practice :
It is needed to connect the input " voie1 " towards channel N°1 of the receiver (classically direction), channel 2 being the depth. If you do the opposite, the device still functions but works at 25 Hz instead of 50 Hz (it misses a cycle over two...) and it looks like if the servos were "lazzy", they move slowly.(try it, there is no risk...). If you want to use this mixer for different mixingg that ailerons/profondor, connect on the "voie 1" smallest of the two channels numbers to mix.
IMPORTANT : always turn ON transmitter
before the receiver...
After power up, you can independantly trim the two neutrals within
10 seconds. If you connected option LED, the LED is illuminated
during this phase. It is during these 10 seconds that the
microcomputer calculates duration N of the neutral of each
channel. The two channels are not mixed yet; an action on the
depth makes move only one servo.
Once this neutral point calibration phase is done, the mixing is effective.
Nothing simpler, try it and program your PIC...
usuall precautions :
Since 5 years this device as been published, tens of them have been realized successfully all around the world.
The devise was tested successfully on several radio devices (Futaba, a NPM receiver, an old 2 channels AM radio, a MULTIPLEX one, a NES receiver...) It should work on any type of hardware but is up to you to check it!
In the same way, I decline any responsibility in the event of damage caused to your hardware following a bad wiring or other defect...
Also compatible with :
- MULTIPLEX EUROPE MC-1010, two mixers flight in Spain, thanks Raul !
- FC16 (just to see, it is programmable) towards a JES micro-receptor. No problem.
- ENJOY
radio (AM from RC Union) a little bit special, and it works
fine tooi, thanks Emanuel !
- Robbe ECO radio 2 chanels in 72 MHz, Robbe receptor, servos Europe BB multiplex, thanks Norbert !
- I tried one on a old FP-TH4 , ( Futaba Radio 4 ch in AM), and all worked fine first time !! Thank you Angelo from Italy.